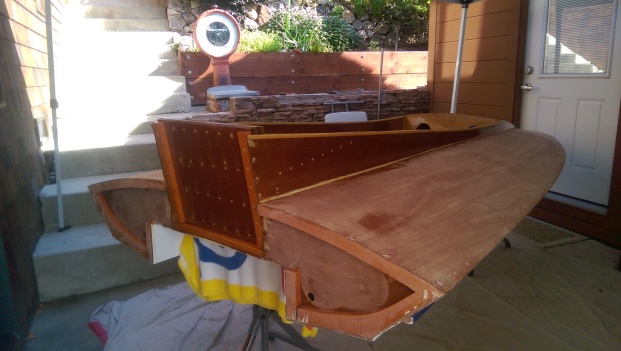
When Brian got back from college in early May, we moved the boat outside for painting, as the fumes are simply too unpleasant to allow painting indoors. I was determined to get the painting done in an expedient manner, but I did not have any illusions that it would be a quick process!
The painting and varnishing process is pretty simple – apply a coat of nasty smelling and messy stuff, let it dry overnight, sand it, clean it, then apply another coat. Keep repeating until you are satisfied with how it looks. If it is windy, or damp, or too hot, or too cool, or you have something else you need to do, then skip a day. Pretty straightforward!
The first step was to apply a clear sealer to the entire hull. The sealer basically protects against moisture, which is a good idea for a boat! I sealed the whole thing, and then sanded to a smooth finish with 80 and 120 grit sandpaper.
I decided as a next step to varnish the interior of the boat. Most of the small hydroplanes I have seen are varnished inside, and the clear varnish would allow me to view my workmanship over the passage of time and see if I improve with future efforts. I applied four coats of varnish, sanding thoroughly between coats with 220 grit sandpaper, and with 400 grit prior to the final coat.
Once I was finished, I really liked the way it looked, in spite of the clearly visible filler, screwheads, nails, etc. So, I decided to spend a bit of extra sanding and clean-up time on the exterior of the cockpit cowl, and stain that as well. I thought the contrast of stain with adjacent paint would look pretty cool – you can be the judge later on as to whether this was a good move! I did consult Karen on this though, as her taste is far better than mine, and she concurred. Who knows, it might have even been her idea…
Next step was to mask off the varnished and previously painted areas, and apply the primer. This marine primer is the nastiest of the paints; white, thick, gummy, and toxic-smelling. It is the only stuff for which I wore a respirator while applying, even in the breezy outdoors. The primer helps improve paint adhesion, and also helps level out the wood grain and other imperfections so the final paint job looks nice and smooth.
Once the primer was applied, it was time to paint the decks. What color? Red. Bright red. Everyone knows that red vehicles are faster than vehicles of other colors.
Painting with bright red paint makes it very visibly obvious that paint gets everywhere, even when you are trying to be neat. I am now the proud possessor of red gloves, red doorknobs, red sinks, shoes with red specs, and red sanding dust everywhere. It’s worth it, though.
Applying the paint is fun, but a little challenging. You pick a couple square feet of the surface to be painted, roll on the paint in two directions (i.e. horizontally then vertically), then lightly drag a nearly dry brush over the area you rolled to smooth out the roller stipple. Move to an adjacent area and repeat, until you are done. Look at the surface from multiple angles to make sure you did not miss anything, then come through with needle nose pliers and gingerly remove the inevitable bug or two that landed on the wet paint.
I applied four coats, sanding with 220-grit after the first two, then just spot-sanding out the bugs and dog hairs that got stuck in the paint overnight before the final coat. Pretty happy with the result; far from perfect, but looks pretty good from an adequate distance! Now it is time to turn her over, repair the considerable damage I did to the paint on the upper hull while fairing the decks, and apply trim. Then we just need a motor, and we are good to go!


